1 Understand inventories owners and permissions
An inventory contains categories, reservable assets and their reservations. A Teams tab creates or displays an inventory. Mirrored tabs show the same underlying inventory. The inventory creator retains full access; additional inventory owners can share responsibility.
An Inventory owner is an application role. It is distinct from being a Microsoft Teams team owner or a Microsoft 365 tenant administrator. A tenant administrator may need to allow the app or consent to browser authentication; daily asset and reservation administration uses Inventory’s own ownership and permission settings.
| Role | Typical responsibility |
|---|---|
| Requester | Find assets, create bookings and track approval. |
| Asset owner | Manage and review bookings for assigned assets. |
| Category owner | Manage the assets grouped in that category. |
| Inventory owner | Configure the inventory and handle requests without a more specific owner. |
| Tenant administrator | Allow app deployment and handle organization sign-in or consent policy. |
Enable Permissions is the central switch. With permissions disabled, the inventory is collaborative and users can edit inventory data, assets and categories. Enable it before configuring a controlled approval workflow. Choose the create and modify policies explicitly, and test using a regular requester rather than an owner.
2 Add an inventory with Max
Example owner: max@melcher.it in the Teams desktop client. Use a dedicated training channel for this walkthrough. In an organization where app installation is restricted, have the Teams administrator allow Inventory & Asset Reservation first.
- Open the target team and channel in Teams. Select + to add a tab.
- Search for Inventory & Asset Reservation and select the app. Follow the app installation or tab configuration prompts.
- When the inventory is ready, select Save to add the tab. Open the resulting Inventory tab.
- Follow the initial setup prompts, or select the option to set up later and add categories and assets manually.
- Open Settings and confirm the inventory name and owner account. Use a descriptive name that distinguishes this inventory from others.
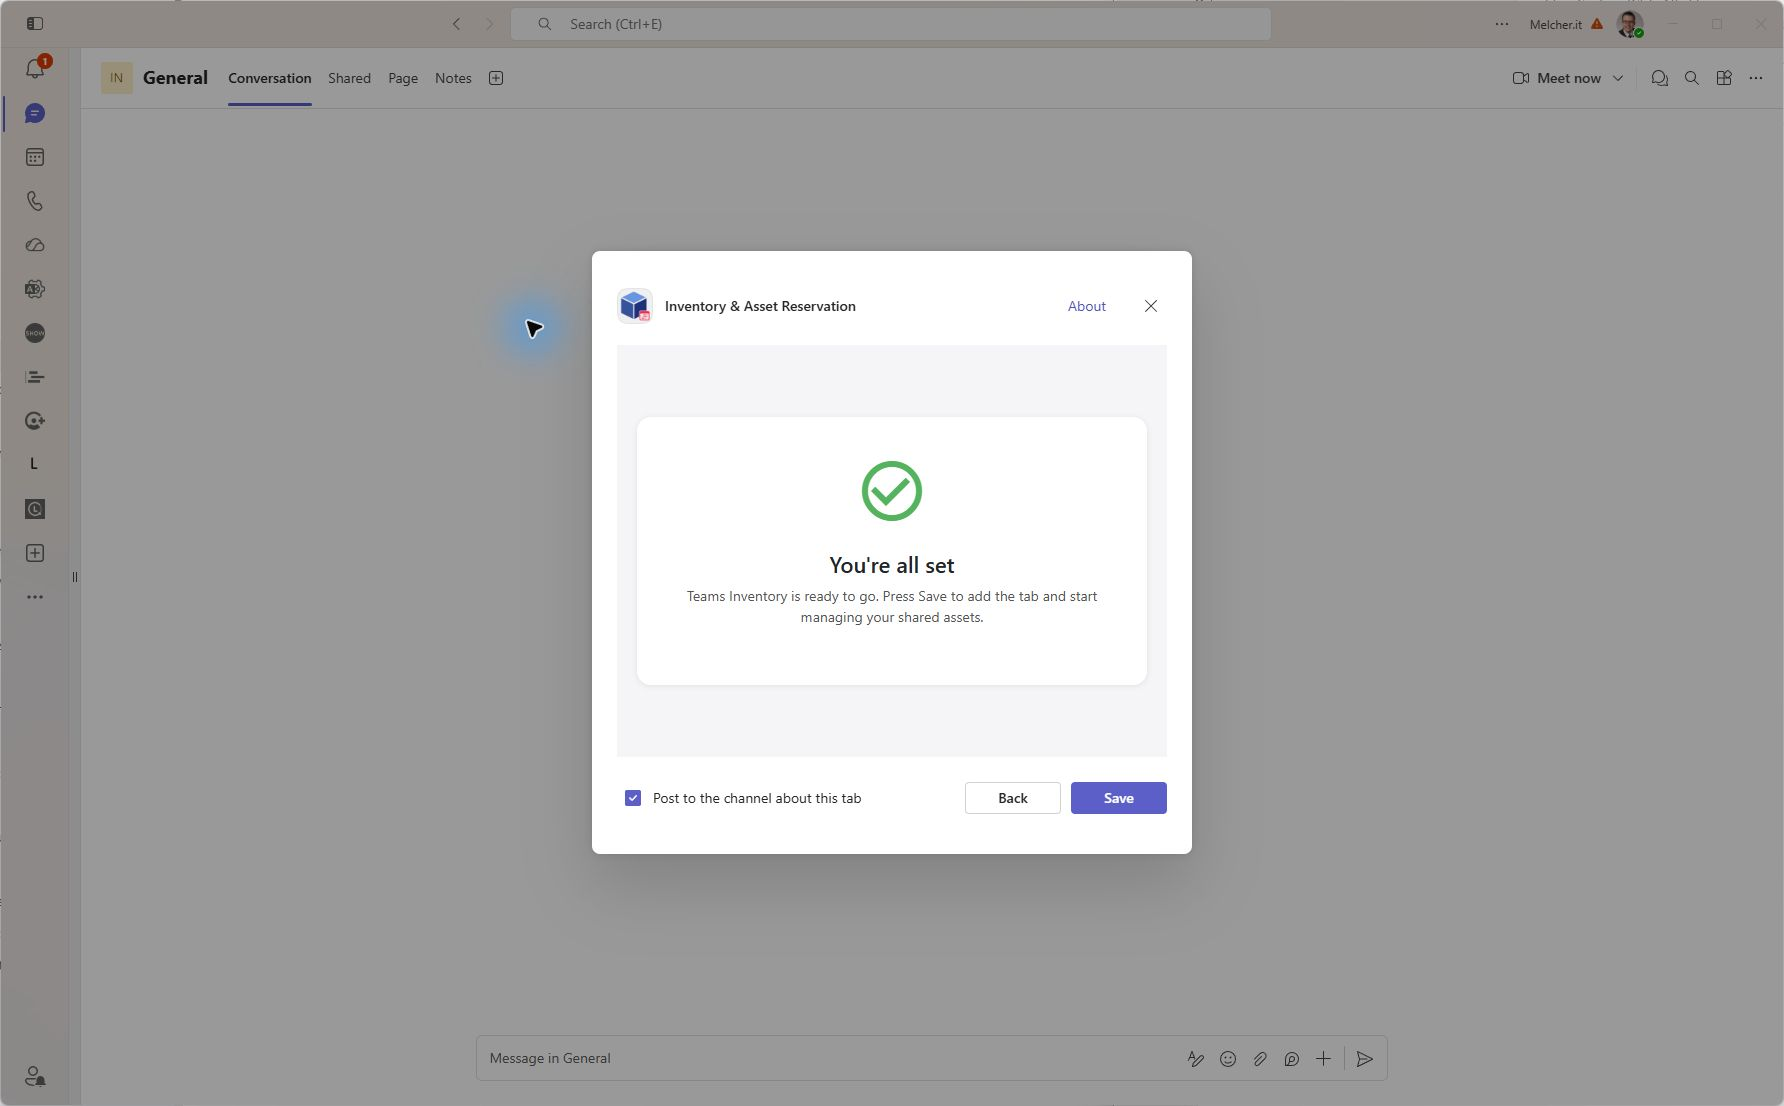
A new tab normally creates a new inventory. To show an existing inventory in another channel, use Mirroring after creating the target tab. Do not create duplicate independent inventories when users should share the same reservations.
3 Complete the basic setup
- Open Settings, General. Review Basic Information and add the people responsible for the inventory. The creator keeps full access.
- Enable Permissions. Set Create or Modify Reservations to Everyone if requesters should submit their own bookings. Set Create or Modify Assets and Categories to Only Inventory Owners when asset maintenance should be controlled.
- Choose Prohibit for Double Bookings if each asset can serve only one reservation at a time. Choose Approval Required for Booking Approval.
- Turn on Approval Notifications so responsible owners receive requests. Review Reservation Notifications separately for start and end reminders.
- Set working days, work hours, displayed day hours, formats and default calendar view. For the training example, guest work hours are 09:00–18:00 and the email time zone is Europe/Berlin.
- Select Save and wait for Settings saved. Reopen the settings if needed to confirm the stored values.
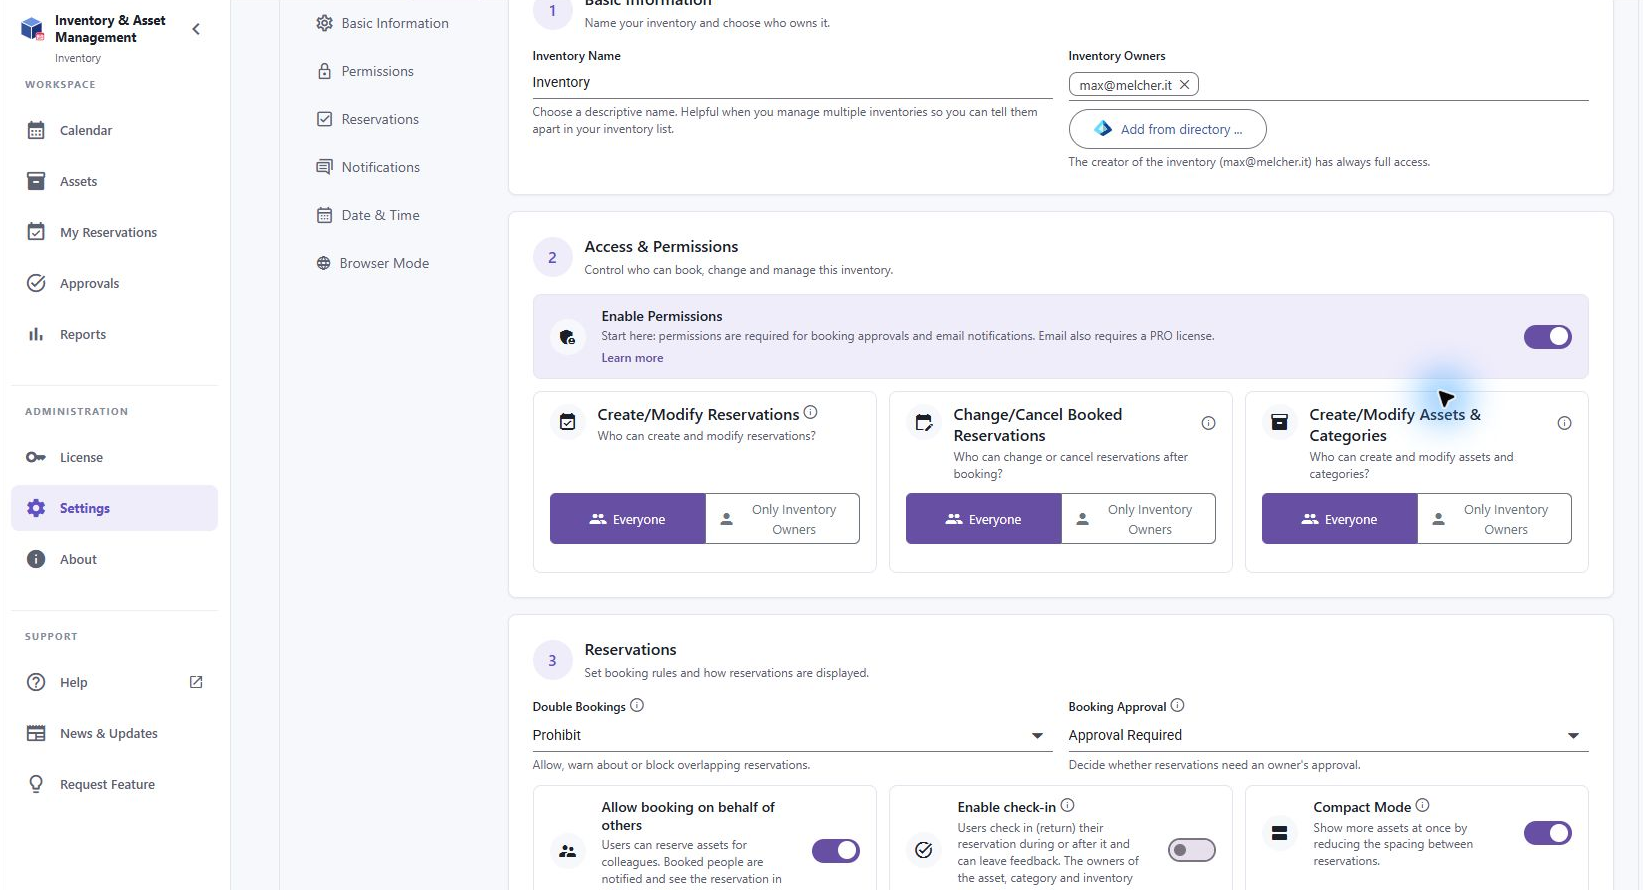
The training scenario leaves requester booking available, requires approval, and uses Prohibit to avoid overlaps. Keep at least one reachable owner. Review permission settings before sharing the channel with a wider audience.
4 Create categories and assets
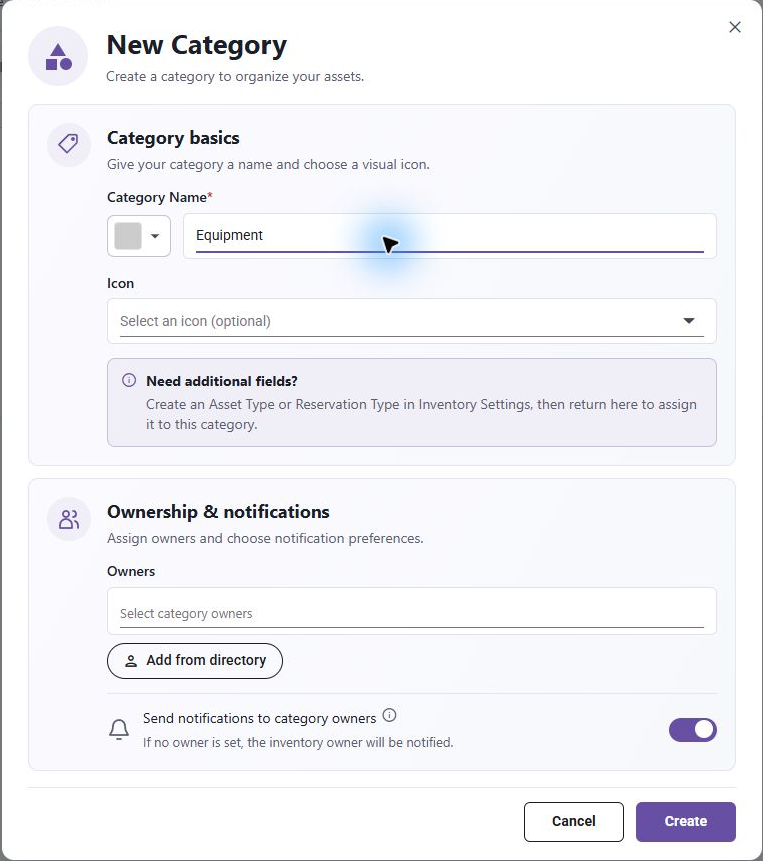
- Open Assets and select New Category. Enter Equipment as the example category name. Choose a color or icon if helpful. Add category owners when that group has its own responsible people, then Create.
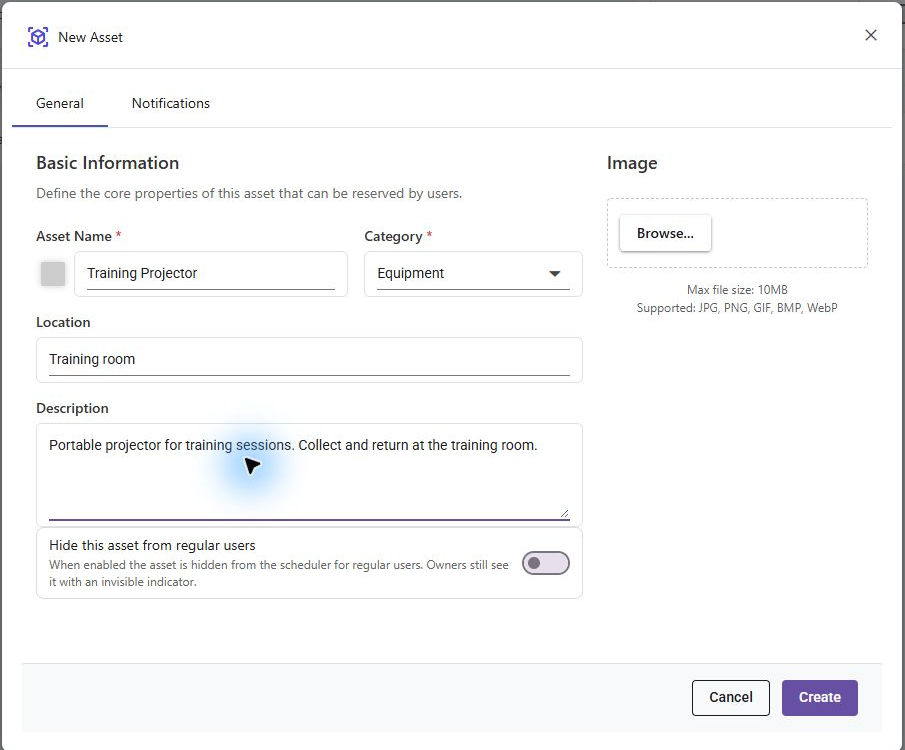
- Select New Asset. Enter Training Projector, choose Equipment, set Location to Training room, and describe collection and return arrangements.
- Keep Hide this asset from regular users off for an asset that requesters and guests should book. Optionally upload an image. Supported formats are JPG, PNG, GIF, BMP and WebP, up to 10 MB.
- Review the Notifications tab and responsible owners. If none are set on the asset, notifications can fall back to category or inventory owners.
- Select Create. Verify the asset card, location and Reserve button. Open the asset later to edit its properties when needed.
Sort Assets in Calendar opens asset and category management. Use its drag controls to reorder assets and move them between categories. Add multiple assets is useful for bulk entry; CSV export helps review the asset list. Delete a category only after it is empty. Before deleting an asset, consider its reservation history and whether hiding it is more appropriate.
Asset types add structured properties such as serial number or capacity. Reservation types add questions to a booking, such as purpose or project code. Assign these types to a category or individual asset as appropriate; they serve different kinds of data.
5 Verify the approval workflow
Use two accounts to verify the configuration: max@melcher.it is the owner in Teams desktop, and mail@teams-inventory.com is the requester in Teams in a browser. The screenshots demonstrate a single request on 9 October 2026, 10:00–11:00.
- As Mail, open the same Inventory tab in the browser. Create Training session for the Training Projector, with Book for Myself. Save.
- Open My Reservations as Mail. Verify that the request is Pending.
- As Max, open Teams Activity. Select the Inventory notification stating that Training session requires approval. Inspect the asset, booked by account and dates.
- Approve the request. The reservation now identifies max@melcher.it as the approver.
- As Mail, verify Approved in My Reservations. The decision can also generate an Activity notification when notifications are configured.
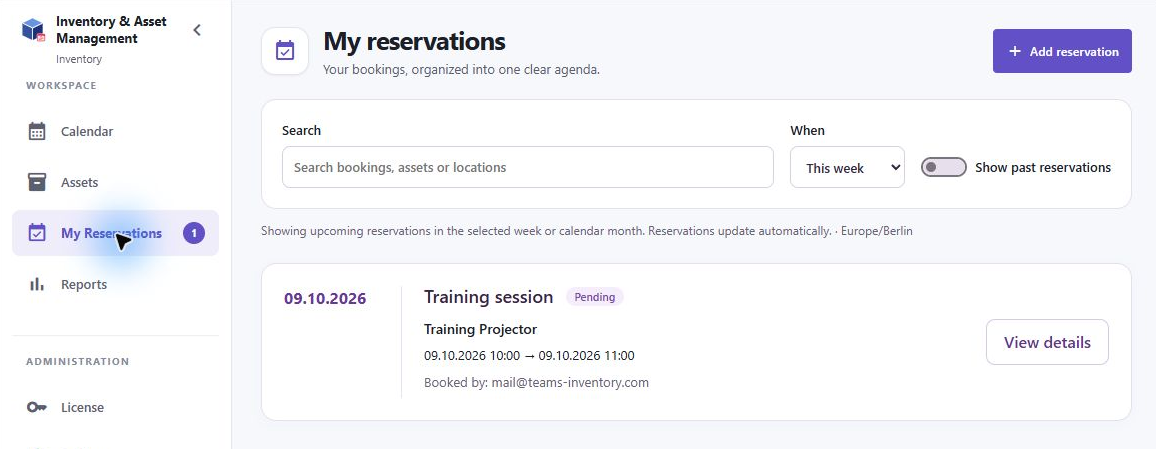
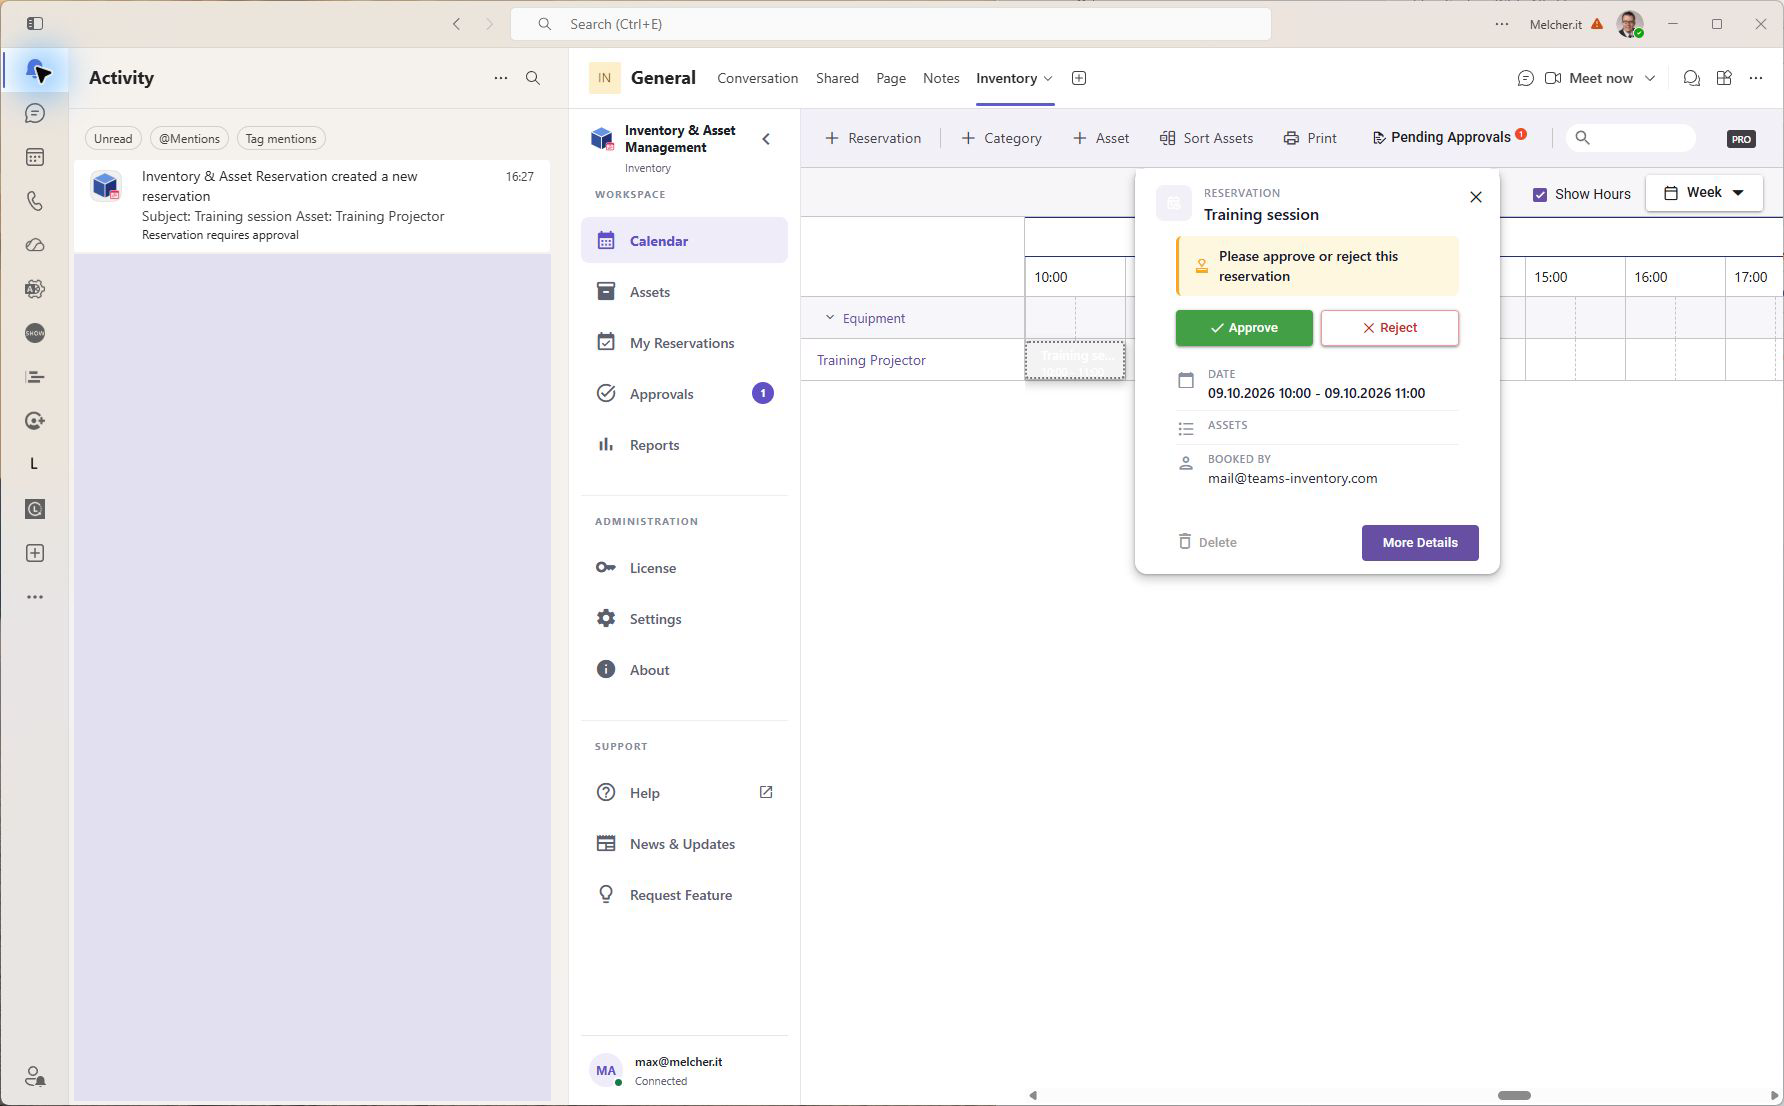
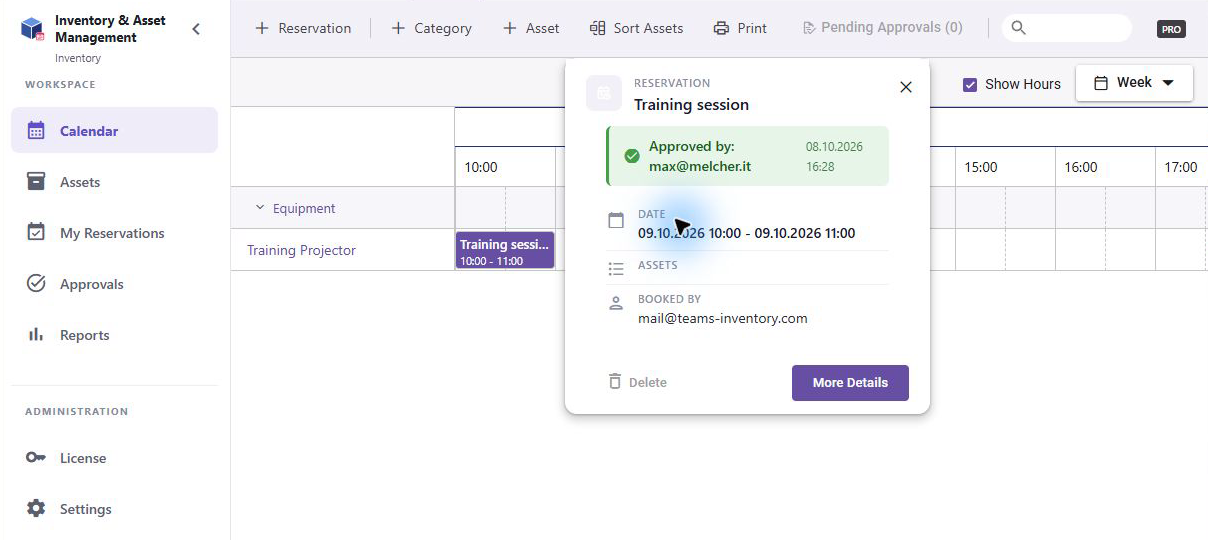
Owner self-bookings may auto-approve. Always test approval with an ordinary requester. A pending booking and an overlap warning are separate states. Date changes to an approved booking may require approval again; verify the updated status.
6 Process approval requests
- Open Approvals. The badge indicates pending requests for assets you manage.
- Use search to find a booking, asset or location. Choose Pending, Approved, Rejected or All in the status filter.
- Select View details and check requester, assets, start and end times, notes, custom fields and history.
- Select Approve or Reject. For repeating bookings, check whether the action is for an occurrence or the series.
- Verify the success message and resulting status. Use the Approved or Rejected filter to review past decisions.
Approval notifications first target asset owners with notifications enabled. If there are none, category owners with notifications enabled are considered, then inventory owners. Owners do not receive a notification for their own request. A decision notifies the creator. Keep ownership and notification choices aligned so requests do not wait for someone who is unavailable.
7 Enable guest reservations
- Open Settings and the Guest reservations tab. Turn on guest reservations. This setting saves automatically.
- Copy the guest reservation link or choose an asset to create a direct asset link. Use Open in browser to test it.
- Choose minimum and maximum reservation duration in whole hours. Both must be between 1 and 168 hours, and minimum cannot exceed maximum. The training setup uses 1–8 hours.
- Review the configured working days and work hours. These determine the guest time slots. Review Holidays and Block reservations on holidays as well.
- Choose whether guests should see reservation custom fields. Turn on Microsoft authentication if guests must sign in; otherwise the contact flow requires name, email and phone number.
- Distribute the link or QR code through your intended booking channel. Copy Embed Code can embed the booking interface on a website. Test the embedded or QR route before distributing it.
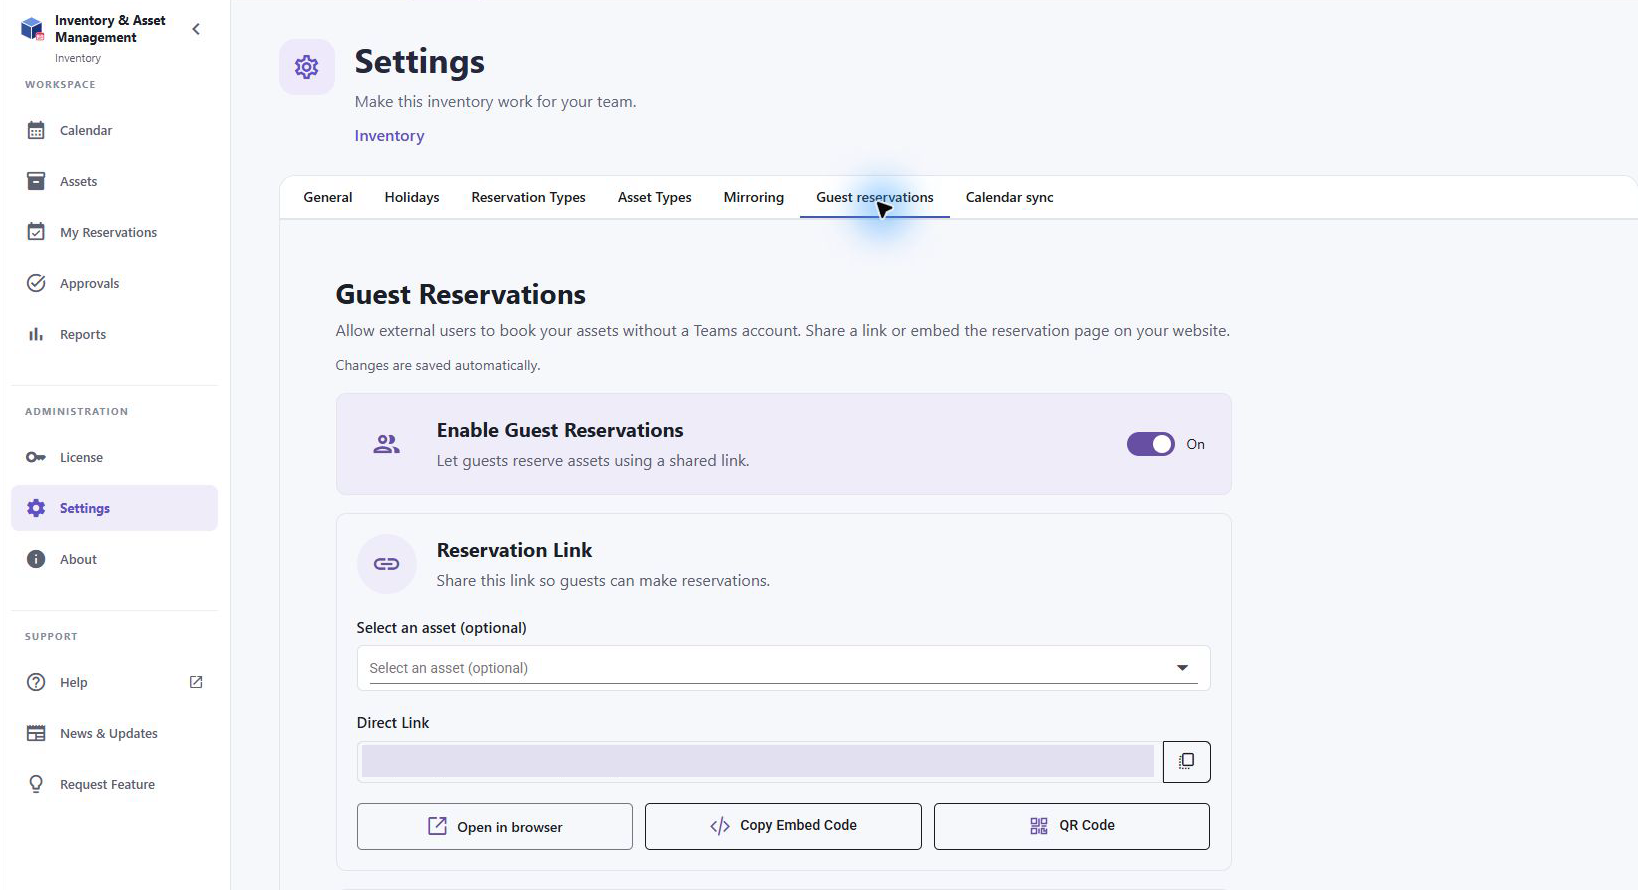
An enabled guest link gives people a booking entry point. Share it only with the intended audience. The general approval policy still applies: Approval Required creates a pending guest request, while Always Approved accepts it automatically. Disabling guest reservations stops offering that entry point; review existing reservations separately.
The QR controls can copy, download or print a QR code. Do not put a live training link, QR code, inventory access token or calendar feed URL in a public user manual. Use your own live link only in the booking channels intended for your users.
8 Test and approve a guest booking
- Open the guest link in a browser. Complete Contact Details, or Microsoft sign-in if required.
- Select Training Projector and a one hour duration. Pick 9 October 2026, 13:00–14:00, or another available future slot.
- Review Confirmation, add notes and Submit Reservation. Verify the Thank You page.
- As Max, open Approvals and find Guest Reservation Training Guest. Review the details and select Approve.
- Verify the approval success message and use the Approved filter to find the booking. Communicate collection arrangements with the guest as needed.
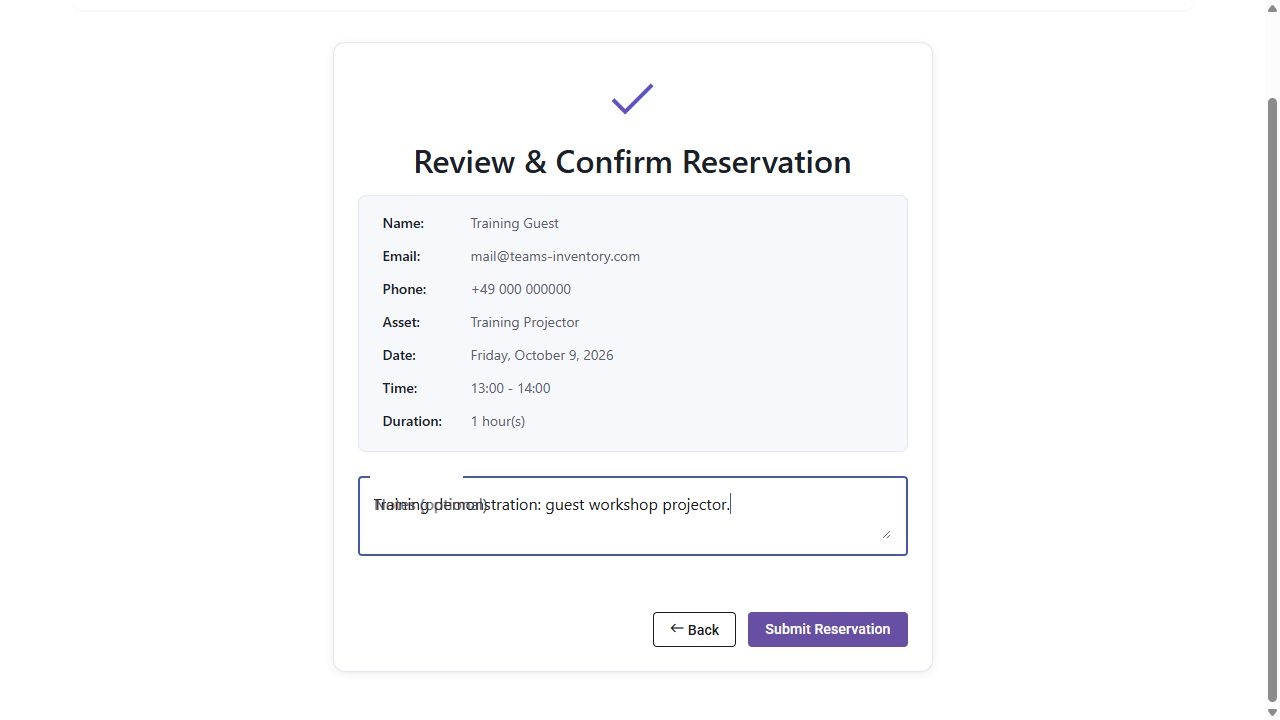
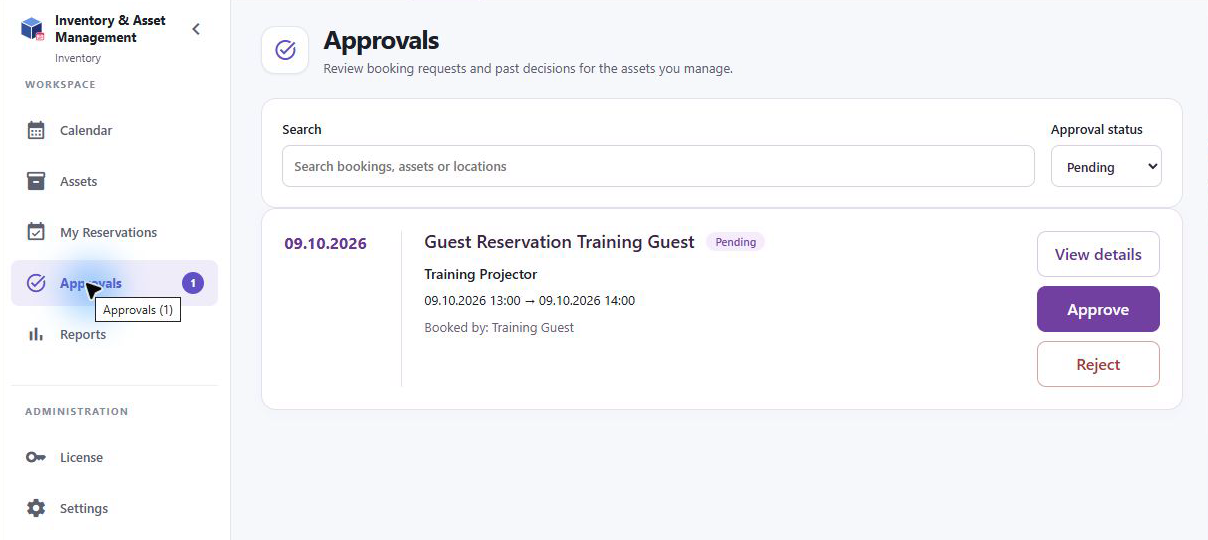
The example uses Training Guest and a demonstration phone number. In daily use, guests should provide usable contact details. The submission page says the guest will be contacted; do not promise an automatic confirmation email unless your actual notification configuration and delivery have been verified.
9 General settings reference
Use General for the inventory’s identity, ownership, reservation rules, notifications and display. Save after changes and wait for confirmation. Reservation and asset types, mirroring and guest settings have their own controls described in later chapters.
| Setting | Effect or choice |
|---|---|
| Inventory name | Identifies the shared inventory; maximum 200 characters. |
| Inventory owners | Adds responsible people; the creator always retains full access. Teams can add people from the directory. |
| Enable Permissions | Turns on ownership and permission controls. Off permits collaborative editing. |
| Create or Modify Reservations | Everyone or Only Inventory Owners. Choose Everyone for self-service requests. |
| Change or Cancel Booked Reservations | Everyone or Only Inventory Owners. Restrict this when changes require owner control. |
| Create or Modify Assets and Categories | Everyone or Only Inventory Owners. Controls maintenance of reservable resources. |
Limiting reservation creation to owners also limits related modification behavior. Choose these policies together, then verify with a requester account. Ownership can exist at inventory, category and asset level; assign the most specific owners where responsibility differs.
| Reservation setting | Effect or choice |
|---|---|
| Double Bookings | Prohibit blocks overlaps; Warning allows but highlights them; Allow permits them. |
| Booking Approval | Approval Required or Always Approved. Requires permissions to configure approval. |
| Allow booking on behalf of others | Allows selecting other booked people; the creator remains the reservation owner. |
| Enable check-in | Allows recording return on approved reservations once they have started, with optional feedback. |
| Compact mode | Reduces spacing in the scheduling display. |
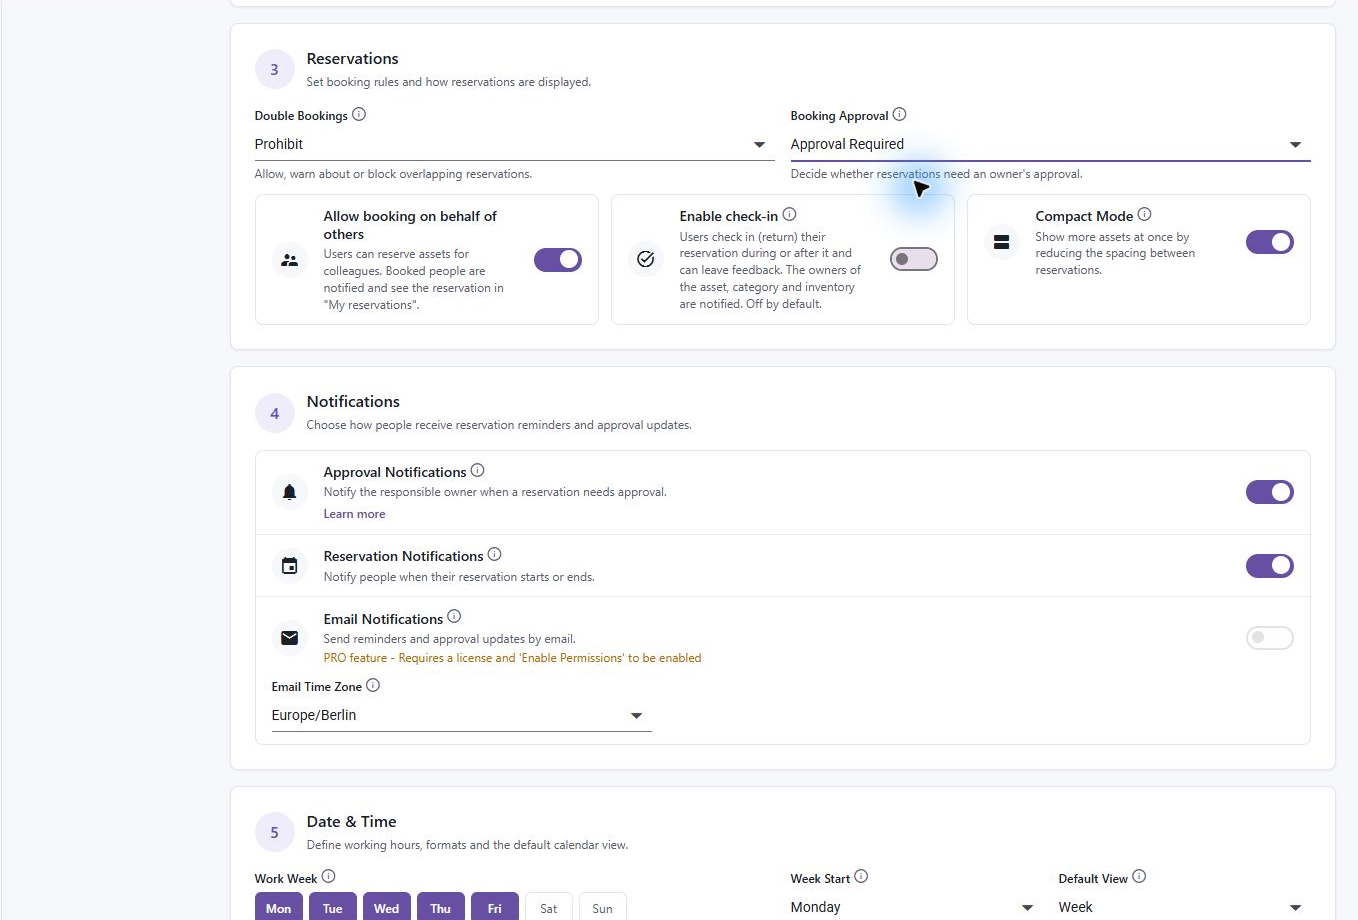
Check-in feedback notifies owners. Check-in can happen during or after the reservation; it is a record of return rather than a substitute for your collection and return process.
10 Configure notification delivery
| Setting | Purpose |
|---|---|
| Approval Notifications | Notifies responsible owners about approval requests and creators about decisions. |
| Reservation Notifications | Enables reservation start and end notification behavior, together with the individual booking options. |
| Email Notifications | Adds email delivery where supported; requires PRO, enabled permissions and an active license. |
| Email Time Zone | Controls times displayed in email notifications, such as Europe/Berlin. |
Asset and category Notifications settings affect the owner routing described in the approval chapter. Set explicit owners when an asset needs its own approver, or let category and inventory owners provide the fallback. Notify on Start and Notify on End on a reservation control its reminders. Booked people can be notified when someone books on their behalf.
- Check that owners are current and reachable and that approval notifications are enabled.
- Submit a test request from a regular user and inspect the owner’s Teams Activity feed.
- Approve or reject it and verify the requester’s status and decision notification.
- When using email, test actual delivery and time formatting rather than relying only on the switch. Check spam or tenant delivery restrictions if needed.
Teams and user notification preferences can affect what is shown. Pending requests remain visible in Approvals even when an Activity notification is missed. Use the queue as the operational record.
11 Set dates hours and calendar views
| Setting | Purpose |
|---|---|
| Work Week | Select the working days used by the working calendar and guest availability. |
| First day of week | Controls the weekly layout. |
| Default View | Day, Week, Work Week, Month or Year; a user’s saved choice can override this default. |
| Work Start and Work End | Highlight working hours and limit guest time slots. |
| Day Start and Day End | Control the visible daily time range. |
| Time Format | 12 hour or 24 hour display. |
| Date Format | Day month year or month day year display. |
| Week Numbers | Off, First Day of Year, First Full Week or First Four Day Week. |
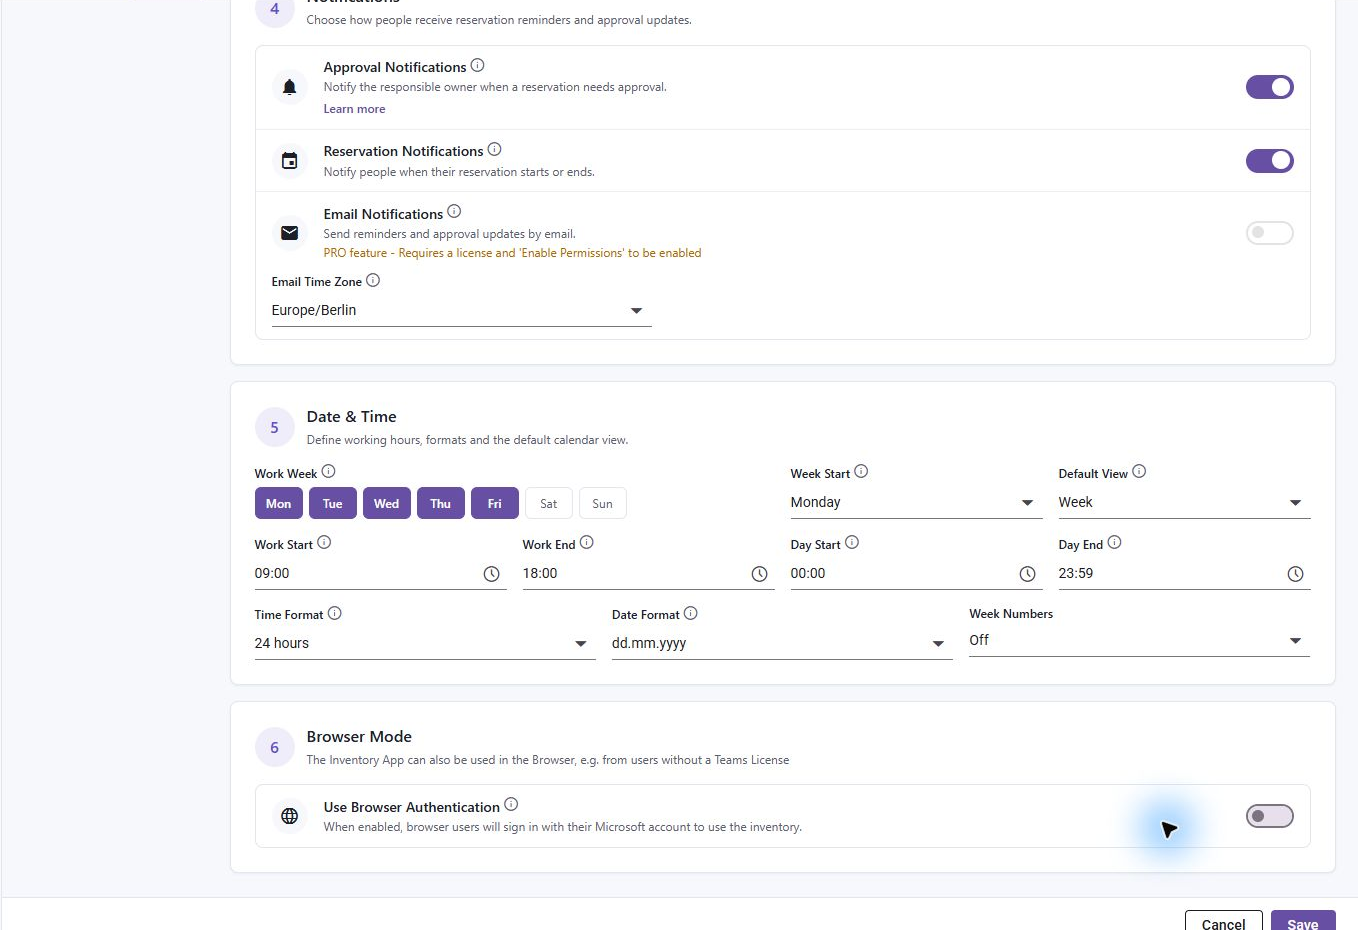
Morning and Afternoon booking presets use the configured workday. Review the resulting start and end times, especially after work hours change. For guests, verify that the chosen duration fits entirely within an offered slot. The Email Time Zone setting formats notification emails; do not assume it changes every browser or Teams calendar display.
12 Configure holidays and blocked days
- Open Settings, Holidays. Select the country and, where offered, the region.
- Review the available holiday types and the holidays shown.
- Set Block reservations on holidays according to your operating policy.
- Save and test a booking on a known holiday and on a normal working day.
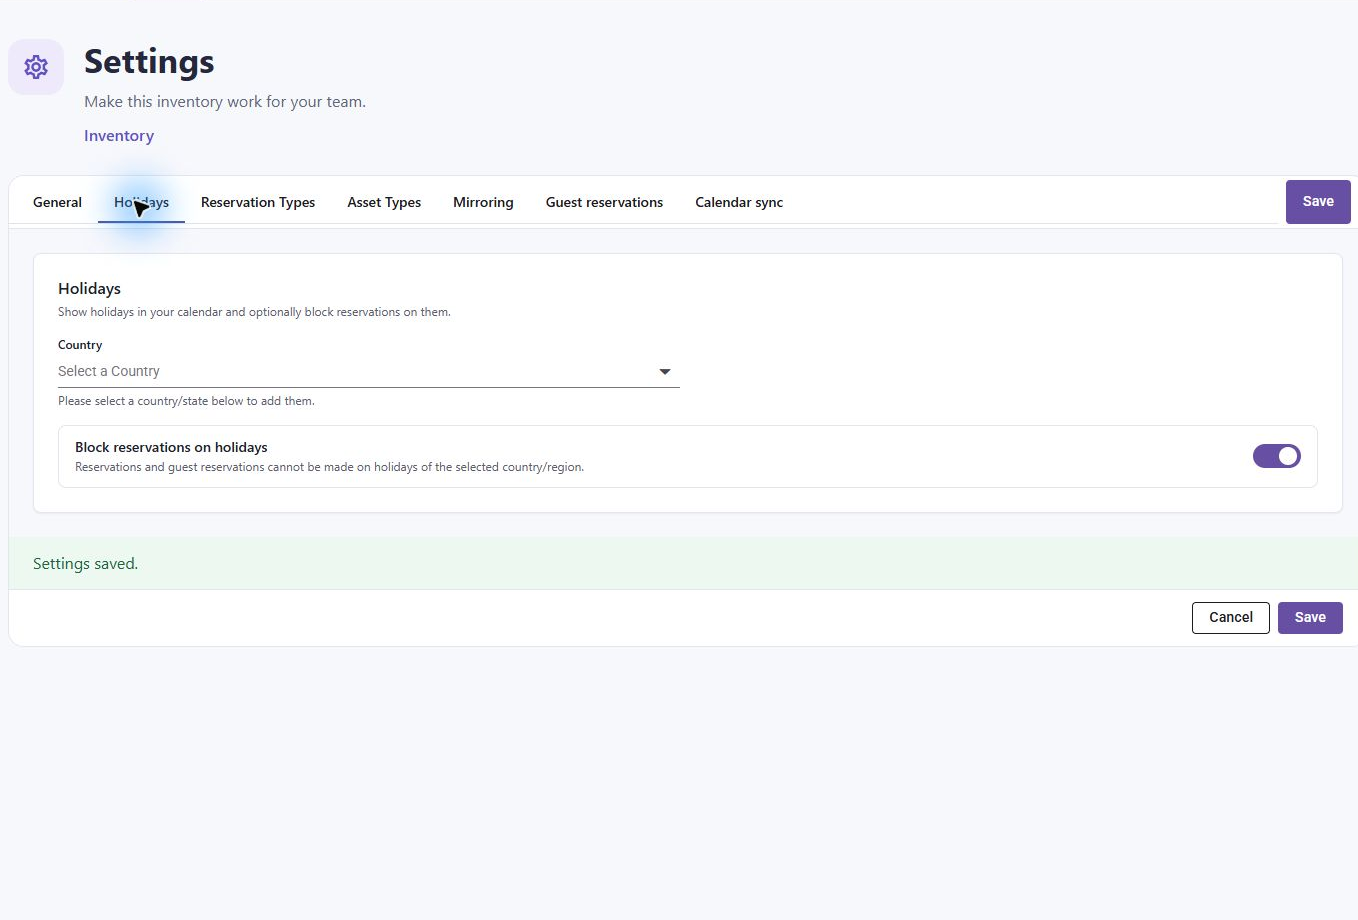
Showing holidays and blocking bookings are related but distinct choices. When blocking is enabled, both ordinary and guest bookings can be prevented on affected holidays. If availability seems unexpectedly empty, check country, region, selected holiday types and working days.
13 Build reservation types and custom booking fields
A reservation type defines the information collected for a booking. Use it for data that changes each time an asset is reserved, such as purpose, project code or event details. Assign a type to a category or asset so its questions appear in the reservation form.
- Open Settings, Reservation Types. Create a type with a clear name and description.
- Add fields, choose each field’s type, and provide a name and help description.
- Choose its placement on the main or additional tab. Mark a field Required only when every booking needs the answer.
- Reorder fields into the sequence users should complete. Configure the choices for dropdown fields.
- Create or Update the type. Assign it to the intended category or asset, then test a requester booking.
- For guest forms, also enable showing custom fields in Guest reservations if you need to collect them there.
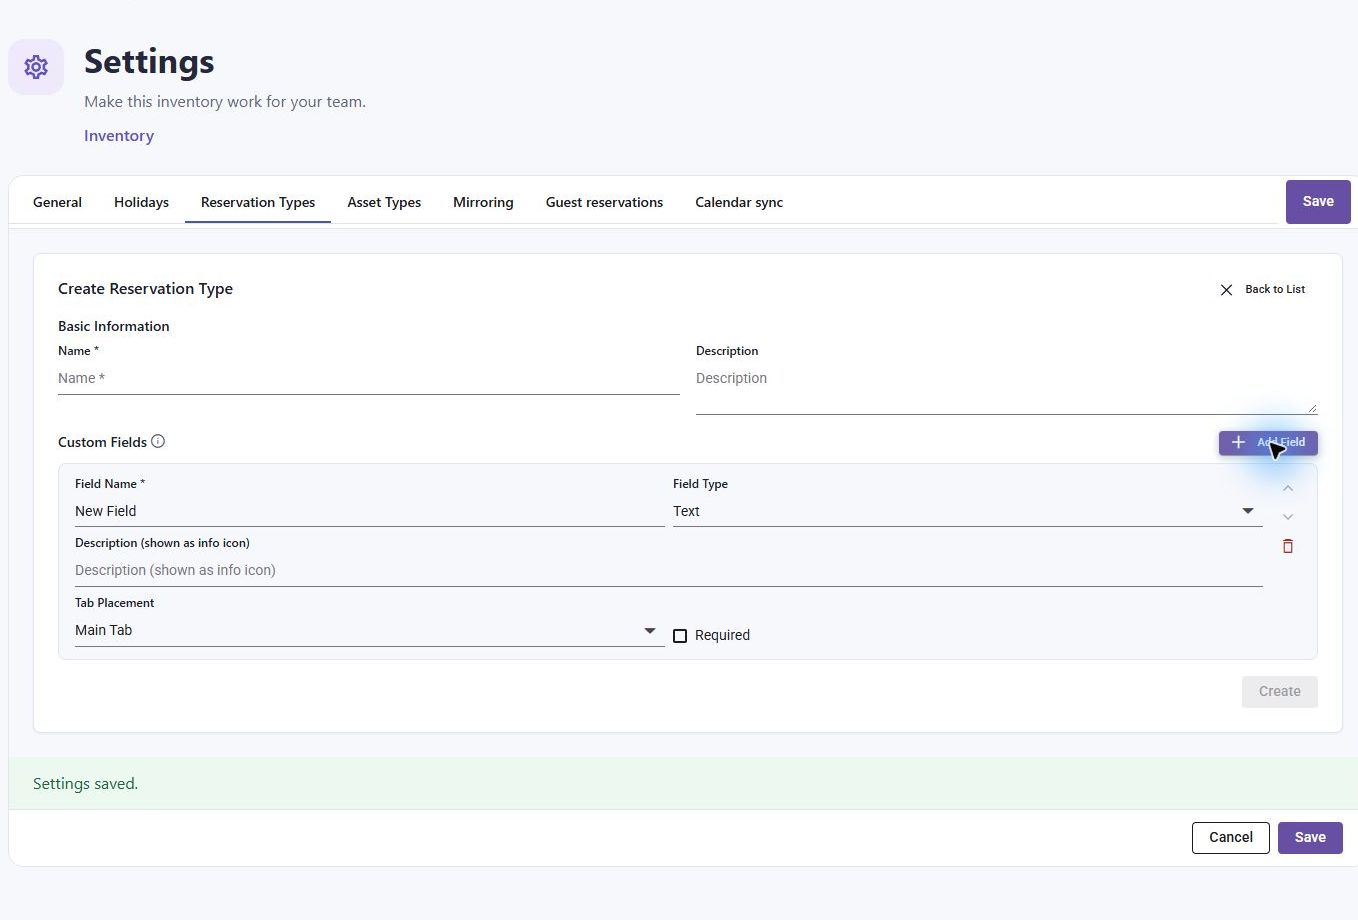
| Field type | Typical use |
|---|---|
| Text | Purpose or a project reference. |
| Dropdown | A controlled set of choices. |
| Number | Quantity or another numeric answer. |
| Date | A calendar date. |
| Date and time | A precise timestamp. |
| Time | A time of day. |
| Checkbox | A yes or no answer. |
| Hyperlink | A related web reference. |
| File upload | Booking attachments; requires PRO. |
Changing a type affects future use of its form. Review existing records before deleting a type or field; deleting a definition removes the fields from that definition. Prefer a small set of stable types and clear descriptions to avoid confusing requesters.
14 Build asset types and custom asset properties
An asset type defines structured data about the asset itself, such as serial number, seating capacity or equipment specifications. It is separate from reservation questions.
- Open Settings, Asset Types. Create a type with a name and description.
- Add fields with appropriate data types, help text and required choices. Configure dropdown options and order fields.
- Create or Update the type. Assign it to the appropriate category or asset.
- Edit an asset to populate its properties, then inspect its details to confirm users see useful information.
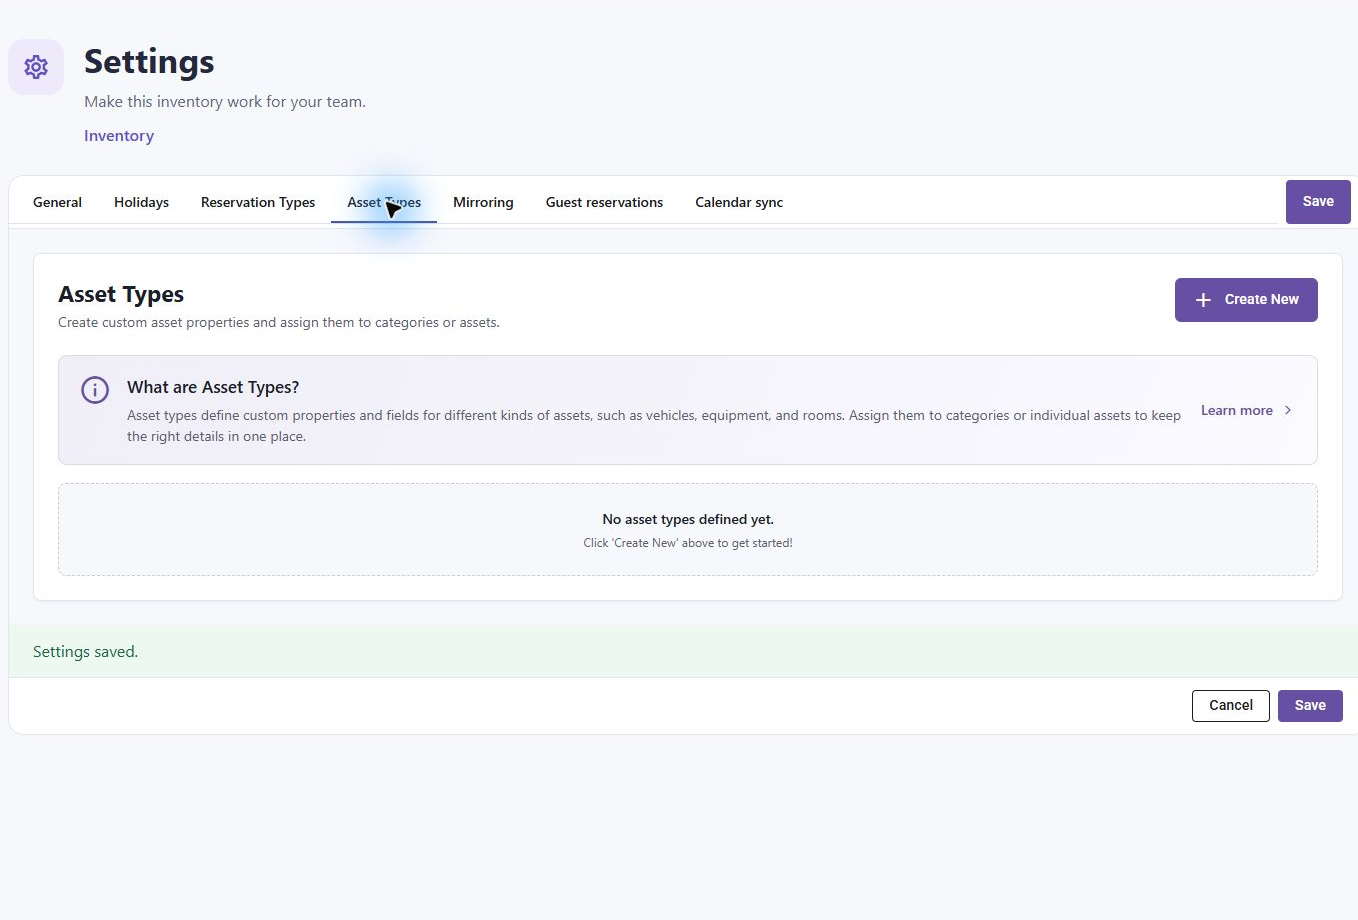
Use the supported field choices offered by the type editor. Keep serial numbers and other identifiers on the asset, and booking purposes on the reservation. Review the impact before deleting definitions or fields. Avoid collecting personal or confidential data in asset properties unless your organization intends to expose it to the inventory audience.
15 Mirror an inventory in another tab
- Open the source inventory’s Settings, Mirroring. Copy its mirroring token.
- Create the Inventory tab in the destination channel. Open that tab’s Settings, Mirroring.
- Enter the source token and select Update tab.
- Verify the inventory name, assets and reservations in the destination. Make a small reversible change if needed to confirm both tabs display the same inventory.
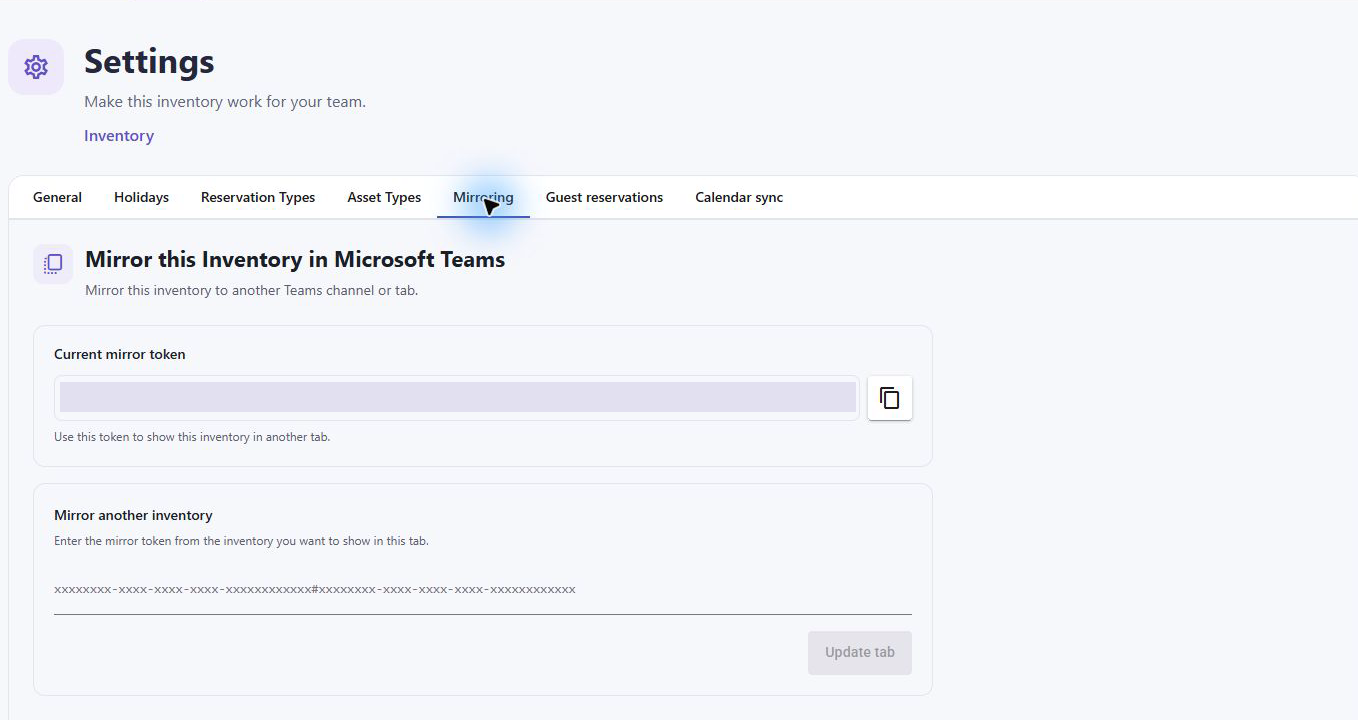
Mirroring displays one shared inventory in several tabs. It does not create an independent copy. Changes and reservations are shared, so check the intended source before updating a tab. The token contains access information: protect it and do not include it in screenshots or public documents.
16 Subscribe from another calendar
- Open Settings, Calendar sync. Copy the inventory’s iCal subscription URL.
- In the external calendar, use its Subscribe from URL or Internet calendar feature and paste the URL.
- Name the subscription clearly, then verify a known reservation after the calendar refreshes.
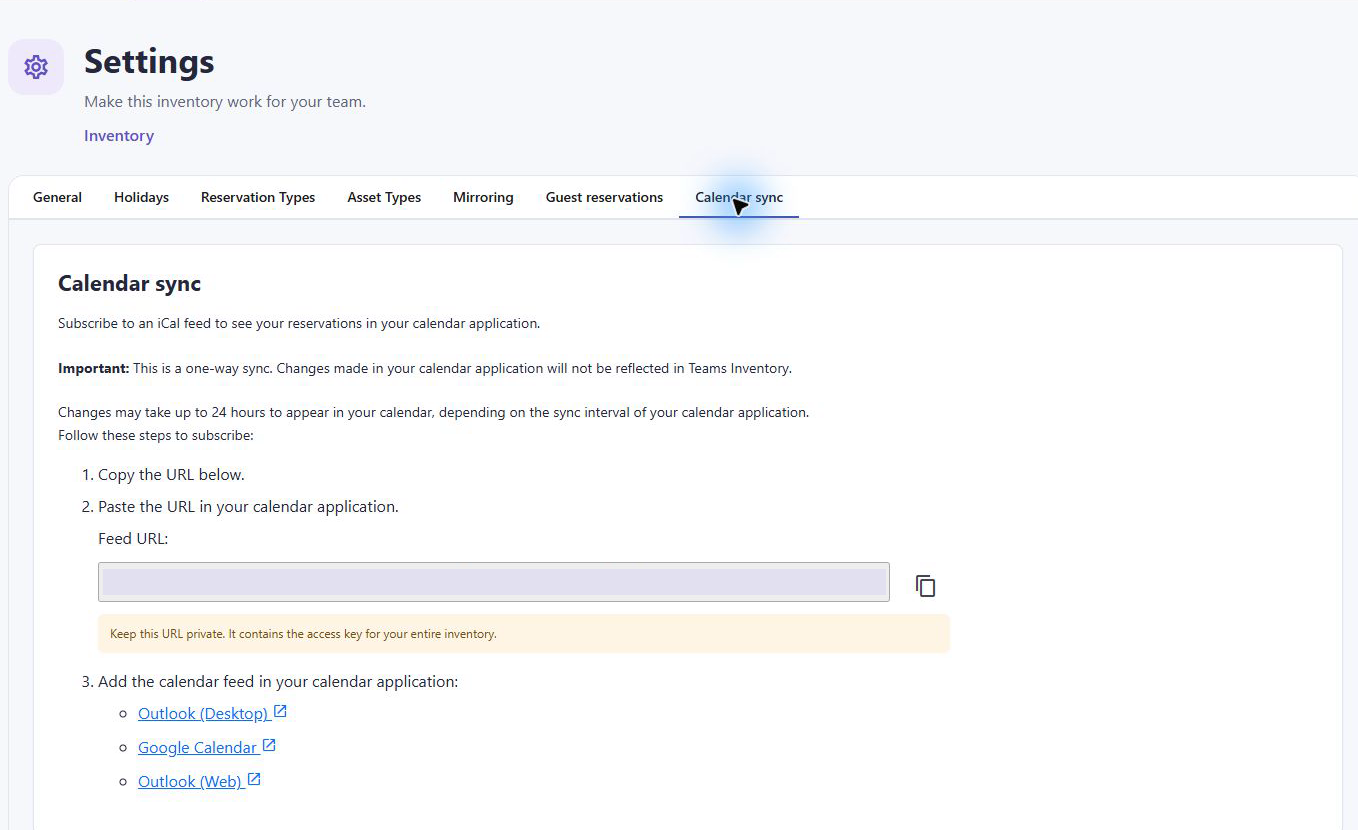
The feed covers inventory reservations and is read only from the external calendar’s perspective. Edits there do not update Inventory. External refresh can take up to 24 hours; use Inventory for current availability and approval status. Anyone with the feed URL may be able to read reservation information, so distribute it only to the intended audience.
17 Configure browser authentication
General includes Use Browser Authentication for using Microsoft identity outside Teams. When enabled, Microsoft sign-in identifies users’ reservations. It can support users without a Teams license. Guest reservations have their own Microsoft authentication choice.
- Review your organization’s browser access and tenant policy with the Microsoft 365 administrator.
- Enable Use Browser Authentication when browser users should sign in with Microsoft identities. Review the displayed consent guidance and required User.Read permission.
- Save and test sign-in from an allowed user. If admin consent or tenant restrictions block access, have the tenant administrator resolve the prompt or policy.
- Verify the lower left identity and create a test reservation to confirm ownership is associated with the expected account.
The training walkthrough uses Teams in a browser for mail@teams-inventory.com. Teams web already provides its signed in identity; do not confuse that with an anonymous guest contact form. Keep identity tests separate for Teams desktop, Teams web and standalone browser access.
18 Manage license capacity
- Open License and review the current plan, asset usage, reservation counts and license details. Usage can cover several inventories.
- For an existing license, use Enter key or the Activate license section. Enter your supplied key and select Activate.
- Wait for the success message and verify Active status and capacity.
- If an operation still reports a limit, check the license association and covered inventories before trying again.
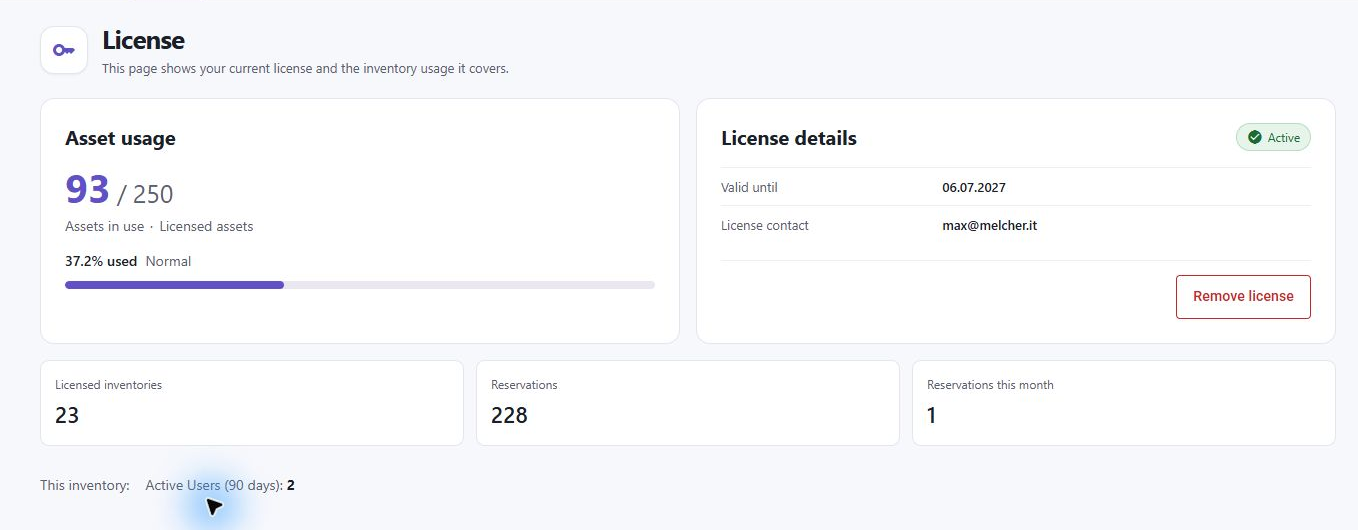
The Free plan shown during this walkthrough limits usage to 7 assets, 50 monthly reservations and 50 total reservations across the inventories counted by that plan. Plan limits and entitlements can change; the live License page is the authority for your inventory. Email notifications and file upload fields require the relevant PRO entitlement.
Keep license keys private. A shared license can cover multiple inventories, so consider its wider scope before removing or replacing it. Removing a license may restore limits and affect operations. Do not publish a working key in a training manual.
19 Run and maintain the inventory
- Review Pending approvals routinely and arrange cover for absent owners.
- Check asset descriptions, location, visibility and owners as resources change.
- Use Reports with asset and date filters for booking review and PDF or Excel exports. Include Notes and Custom Fields only when the audience needs them.
- Review check-in feedback and follow up on returns or reported damage.
- Recheck working days, holidays and guest duration limits before seasonal schedule changes.
- Test a regular requester and guest after material policy changes.
- Review mirrored tabs and calendar subscriptions when changing the audience or ownership.
Use clear titles and collection instructions so users know what they are reserving and how to return it. Reserve a training inventory for demonstrations to avoid disturbing real bookings. Avoid copying production access tokens or private guest links into training material.
20 Troubleshoot administration
| Symptom | Likely checks |
|---|---|
| New asset opens License | Review asset capacity and whether the license covers this inventory. |
| A request approves immediately | Check Always Approved and whether the requester is an owner. |
| Approvals is missing | Enable Permissions and verify inventory, category or asset ownership. |
| No owner notification | Review Approval Notifications, asset and category notification routing, fallback inventory owners and Teams preferences. |
| Guest form has no assets | Create a visible asset and check whether the direct link targets an available asset. |
| Guest page has no slots | Check workdays, hours, duration, conflicts, holidays and future dates. |
| Custom fields are missing | Check assigned reservation type, tab placement and guest Show Custom Fields. |
| Changes were not retained | Use General or Holidays Save, type Create or Update, or Mirroring Update tab as appropriate. Guest settings save automatically. |
| Calendar subscription is stale | Allow external refresh delay and verify the source inventory directly. |
| Requester cannot modify a booking | Review Change or Cancel Booked Reservations and ownership. |
Before contacting support, capture the exact error text, account, inventory name, asset, dates and steps to reproduce. Mask access tokens, calendar subscription URLs and license keys. Use Help and About for product support information, and News & Updates for recent changes.